Showing posts with label HVDN Review Lens. Show all posts

Wednesday, March 9, 2022

Is it a mag loop? Lets find out!


Kenwood TH-D74, Alinco DJ-MD5XTG, Lanch HG-UV98, APRS, VHF 2m loop antenna, HYS, HVDN, DMR, amateur radio SHTF

Here is a preliminary review of a recent antenna toy acquisition thanks to some spare Amazon points.

If this antenna proves to be a good option for MF waves instead of EF waves, this is likely going to become a popular product pretty quick. Let's dig in here, shall we?

MF, EF - What is it? A round antenna duck?

Here the antenna is on Amazon and it comes in BNC, SMA and SMA-J variants so it will pretty much work with most radios if you buy the right one.  

The vendor on Amazon does not call this a magnetic loop and I have not taken this antenna apart to see if a hidden capacitor is in that black bubble at the top of the loop but I suspect there is.

For me, I chose the BNC connector antenna version since using it with an adapter like the ones shown in the "Portable RF Connector Emergency Kit" are always on hand.


Kenwood TH-D74, Alinco DJ-MD5XTG, Lanch HG-UV98, APRS, VHF 2m loop antenna, HYS, HVDN, DMR, amateur radio SHTF
Where to find this?   Look on Amazon


How does this compare to the original factory antenna?

The radios tested with the HYS antenna pictured include the Alinco DJ-MD5XTG, the Kenwood TH-D74 and the Lanch HG-UV98 all using the original factory antennae.

A second round of testing was done with all three same radios but with the same aftermarket Diamond SRH320A tri-band antenna.

The test scenario was to communicate via a 2m repeater 30 miles away with all three different antenna options and at all available power levels for each radio. 

The results were from an audible report from different users on the repeater without telling them what I was doing over the span of a few hours on different days.

Kenwood TH-D74, Alinco DJ-MD5XTG, Lanch HG-UV98, APRS, VHF 2m loop antenna, HYS, HVDN, DMR, amateur radio SHTF


Results of Test: Non- Scientific you say?


Kenwood TH-D74, Alinco DJ-MD5XTG, Lanch HG-UV98, APRS, VHF 2m loop antenna, HYS, HVDN, DMR, amateur radio SHTF


The reason why I chose to use different radios is that different antennas will work differently based on the radio mass offered as the reflective or counterpoise part of the antenna system. What?   Here, look into counterpoise or "Tiger Tail" if you must learn more...

This test allows us to see more uniform tests in a real world environment instead of lab style results.

For each transmission, the radio was held the same way and at the same height.

Signal reports in green were all positive and as good as one could expect to come from an HT 30 miles from a repeater. Yellow reports included comments of fading or weak signal but still audible.  The red reports were scratchy or not very pleasant sounding.

At first pass, we can say that the HYS "Loop" antenna and stock antenna are all pretty much about the same results.  As expected, the longer and higher "gain" Diamond antenna worked the best.

Now with some baseline curiosity under control, lets do something more scientific in terms of radiation patterns and reception tests.

Is this an EM or RF antenna?

To test if the HYS functions in the "electro-magnetic" wave or the "electric" wave function,  I used a field strength meter to check radiation patterns of all three antennae at three distances outside in my backyard away from anything before it snowed this morning.


Kenwood TH-D74, Alinco DJ-MD5XTG, Lanch HG-UV98, APRS, VHF 2m loop antenna, HYS, HVDN, DMR, amateur radio SHTF


Based on the test data as expected, stronger signals from the stock and Diamond antenna were strongest when they were vertically oriented which matched the polarity of the sense antenna used with the field strength meter.   

When transmitting with the radio held horizontally, the field strength meter dropped to more than 70% less than what was shown in the vertical test.

Here is the interesting thing with the HYS antenna though. No matter which orientation (horizontal or vertical) the same signal strength was recorded at the field strength meter.

MATH TIME  (1005/146.500 MHz = 6.8 * 12 = 82.3 inches)

Rotating the HYS antenna to have the edge of the hoop or broadside of the hoop aimed in phase with the sense antenna did not show any major differences unless I moved to the furthest test location which was five full wavelengths  away from the sense antenna.  

At the one and three wavelength distance, there was no major difference with all three radios transmitting at highest power levels.

What does that mean?

I think it is safe to say that the polarization of the HYS antenna does not conform to the normal EF wave portions and this seems to function like a true magnetic loop when used for transmitting since its polarity and field strength are very different.

For reception, there is a very sharp null off the edge, but it is very sharp.  Testing this with an attenuator built in to the Kenwood TH-D74 while tuned to the local repeater or NOAA Weather station which are known locations was the only way I could tell there is a sharp null.

Magnetic waves work differently compared to electric waves.  When a true EM or MF antenna is used, signals received may be lower, but with less noise.  This means that the "signal to noise" radio is higher and better for reception usually.   This is what makes a true MF antenna interesting.


Kenwood TH-D74, Alinco DJ-MD5XTG, Lanch HG-UV98, APRS, VHF 2m loop antenna, HYS, HVDN, DMR, amateur radio SHTF


This  becomes important especially for HF frequencies where there is more man made noise than ever.  Even still, today more man made noise also happens in the VHF spectrum and this small loop might come in handy. 

If you want to learn about EM antenna, especially for HF, use your Google subscription to discover more about that. Many options exist, including overpriced commercial products and many DIY projects that are fun to look at if you are interested in this for HF spectrum communications.

Further Testing Needed

There are not many people local to me involved in casual non-contest 2m SSB or FT-8 activity to see how well this will work as a portable antenna for SOTA with the Icom IC-705, so that will have to wait.  

Some testing on APRS however has been interesting but will need to drive around with the antenna on the roof for more testing too.

Overall, I think this antenna is worth a purchase if you have some Amazon points or other disposable funds anxious to leave your ownership. 


Kenwood TH-D74, Alinco DJ-MD5XTG, Lanch HG-UV98, APRS, VHF 2m loop antenna, HYS, HVDN, DMR, amateur radio SHTF
Your mother told you NOT to stare, right?  Here are some of the things used during the test
(Source:  Steve Bossert K2GOG)

Sunday, March 6, 2022

CHARGED UP REVIEW: Lanch HG-UV98 Battery & Cradle Charger


Way back in October 2019 was my original review of the Lanch HG-UV98 dual band VHF/UHF analog APRS radio. 

Now it is time for a little bit of an update regarding the battery life.

Since my original review and a bunch or other related articles, I have purchased a second radio because it is good to have a spare on hand just incase.

This obscure but affordable radio has proven to be a great "field friendly" radio for times where the more expensive APRS capable Kenwood TH-D74 is not worth taking a risky drop while scrambling up a hill or in the snow.

While the vendor website is no longer in operation for Lanch, its distributor Venus Information Technology has provided excellent support even during COVID times and has many in stock and offers the software for programming too, which can also be found on HVDN as well.

Included with the original Lanch HG-UV98 purchase was a USB car and wall charger plus one USB micro cable.  To charge the radio battery, you simply plug in the charge to the port on the rear of the battery. 

As you can see below, these accessories never even left the box since I had many other chargers to use already on hand!


24 Months:  Battery Review

There are not many amateur radio's that can charge over USB power even in 2022, so considering that Lanch offered this feature in 2019, this was a major benefit feature to have for interoperability.

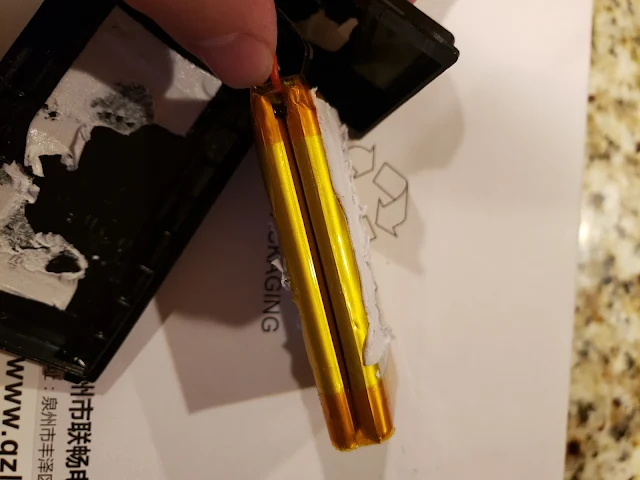
Just before Winter Field Day 2022, my original HG-UV98 battery decided to "puff out" which meant it was time to order up some spares. 

The below photo shows my disassembled battery which inside is a pair of 3.7V 2500 mAh capacity cells held in place by adhesive tape as found in many other battery packs. Only one of the cells seems to have malfunctioned though so I have plans for the remaining good cell.


Two series 3.7 Volt 2500 mAh LiPo cells can be found inside the Lanch HG-UV98 battery (Source: Steve Bossert K2GOG)
Two series 3.7 Volt 2500 mAh LiPo cells can be found inside the Lanch HG-UV98 battery
(Source: Steve Bossert K2GOG)

The insides of the battery also includes a USB micro converter and charge controller so these will likely find use in some other DIY project later on, so DO NOT throw out your old battery when it eventually fails! 


A USB micro charge converter can be found inside the battery along with a charge controller
(Source: Steve Bossert K2GOG)


Talking about the new charge cradle

In mid 2021,  my contact at Venus Information Technology let me know they had developed a charging cradle for the radio and were offering that plus a battery for sale for only $32.60 USD.

On February 22nd I placed the order and on March 6th the package of charger and a few extra LC-01 batteries arrived from China. Lets now look at what arrived!


Blackberry USB micro cable Lanch HG-UV98 APRS radio
Recognize the logo?  A former smartphone vendor must have had a
surplus of USB cables that Lanch has found a second life for!
(Source:  Steve Bossert K2GOG)

Lanch HG-UV98 Battery Cradle Details

Here are three photos of the new cradle, clearly showing it is designed to be charged with USB micro connections.  You can charge the battery without attaching it to the radio if needed.

The cradle only comes with a USB micro wire and no USB charger, but that is ok as I already have left over ones from past or other purchases.

The label on the bottom of the charger helps validate that the battery does the conversion from 5V USB standard up to 8.4V needed to charge the battery.  

But, interestingly the inside of the charge cradle has its own voltage converter. When the battery is charged in the cradle, the internal battery converter is bypassed.


Extra Bonus Details

Electronic devices these days often have shorter life cycles so that vendors can sell new equipment, but that is sometimes wasteful.  

The good news is that the Lanch HG-UV98 will soon be joined by a new radio which combines the APRS and radio programming into one common MCU.  

This means no need for two separate computer  programming applications.  Both radios will use the same battery which is the major extra bonus!

Support these products!

Normally, I do not outwardly endorse a vendor product, but in this case I will.  Based on the behind the scenes support from Venus Information Technology and a lack of other reliable low cost analog AX.25 1200 baud radios, the Lanch HG-UV98 will be a great addition to anyone looking for a first or additional APRS radio.


Thursday, September 16, 2021

Pi-Star: Sharing your public hotspot


Have you noticed that HVDN has not posted much about DMR or even things relating to the different digital voice modes for a while?    Did you look closely at the photo above for some laughs?

Our focus has been on community growth and awareness via the massive June Hudson River Radio Relay event, a mini QRP HVDN field day, helping to support the USMA at West Point triathlon via APRStt this past August and most recently, spending the day at the Old Rhinebeck Aerodrome to support the OMARC K2A effort.

Plus, with a new weekly commitment to support UNDR Net, there has not been much free time to do much else this summer as HVDN prepares for a series of fall season events. 

A reminder from Brian W2BRM today that we have not chatted in a while, made me think I should go find something interesting to write about related to Pi-Star as I try to find the time to do a short video about a duplex hotspot to be included in Pete N2MCI's upcoming presentation about the basics of hotspots to the OMARC club coming up in a few weeks time.

Public Hotspot

Many people are afraid to touch certain buttons in Pi-Star, but I am not one of those.  Most people use a hotspot to just provide communications for themselves which means your hotspot is in private mode and only lets a radio programmed with your DMR ID to use your hotspot.

If you click the button under "General Configuration" from private to public, here is what will happen.

Up until recently, changing to a "public" hotspot would allow for anyone to use your hotspot.  This is helpful at public events as an example if many people have a DMR radio and it makes sense for them to all be on one hotspot for internet communications, while local use can take place via a standard simplex channel.

If you want anyone to be able to use your hotspot, leave the "DMR Access List" box blank.

Alternatively, you can add a list of DMR ID's separated by a comma which would allow only your closest trusted friends to also use your hotspot.

Be sure to remember to hit "apply changes" when adding or deleting DMR ID's. 

Bigger picture use case

Now, lets say your club has a DMR repeater that is managed by a Pi-Star interface on your favorite DMR network like Brandmeister or TGIF.  Using this feature could be helpful to ensure that only members of your club are permitted to use the DMR repeater instead of anyone else.  

While this can be considered exclusionary and not the best way to portray amateur radio, this feature may be helpful to help promote the use of certain talk groups on a repeater rather than a hotspot. Should an issue happen where preventing a specific user is needed, this feature can permit that also.

There are many ways this feature can be used, so feel free to share some comments below on how you may wish to use this or not.

-Steve K2GOG & HVDN Team

Monday, August 16, 2021

BREAKING NEWS: New C4FM radio coming soon - Yaesu FT-5DR

Yaesu FT-5D


It has been a little while since a new main stream vendor introduced product to market, so lets focus on the new and upcoming latest amateur radio to offer Yaesu's proprietary C4FM based digital voice radio, model number FT-5DR.

As of August 16th, 2021 the Federal Communications Commission has awarded the FCC ID of K6620825X21 to this dual band (2m &70cm) small handheld radio.

Feature wise, nothing overly different compared to the FT-3D radio beyond a smaller size and more overlapping capability with the FTM-300DR  mobile radio. 

A listing of features is below and a suspected retail price in the Unites States upon a potential October 2021 availability should be about $449.99 USD.  

High Level HVDN Focused Overview

  • This radio will support dual independent receivers, but will not be duplex which will not appeal to satellite enthusiasts. 
  • Reception is just AM/FM/DV modes and not AM/SSB/CW even though it has a wideband 0.5 to 999 MHz tuning range.
  • Access point mode via a USB cable can be made to create a hotspot when connected to a computer.
  • Bluetooth headset for voice/PTT but not for wireless programming. 
  • SD card for recording audio and side loading memory updates as needed.
  • Will no function as a KISS TNC like the Kenwood TH-D74 when used for APRS

Less Important Details

  • Compact Design and Reliable 5W RF Power Output (Selectable 5W / 2.5W / 1W / 0.3W)
  • High Visibility Full-Color TFT Touch panel Display (*The color of the operating frequency may be selected from White, Blue or Red.)
  • Dual band Simultaneous Receive (V+V / U+U / V+U / U+V) & C4FM/C4FM Standby - Advanced C4FM Digital Mode with AMS (Automatic Mode Select), DG-ID feature and Smart Navigation
  • 1W (1000mW) of loud audio power with C4FM clear and crisp audio quality - Rugged Construction: Robust Rubber Protection / IPX7 Rating Water Protection
  • TOUCH & GO Operation with Activity Monitor
  • PMG (Primary Memory Group Activity Monitor)
  • CAM (CH Activity Monitor)
  • VFO Band Skip Function
  • Memory Auto Grouping (MAG) Function
  • High Speed Band Scope Function enables monitoring up to 79ch centered on the current VFO frequency (Selectable 79 / 39 / 19ch)

  • Full-Flat back body provides excellent grasp / Quick Release Holster(SHB-26BK) Included
  • Built-in 66ch High-Sensitivity GPS Receiver
  • Built-in Bluetooth® unit and the VOX function support wireless and easy Hands-free operation
  • WIRES-X Portable Digital Node compatible
  • Dual Simultaneous AM/FM Broadcast Reception and 2-channel Monitoring
  • 1200/9600bps APRS® Data Communication
  • Recording Function
  • Micro SD Card Slot (up to 32GB)

Saturday, August 7, 2021

80's & 90's Flash Back Hand Held's

Jonathan KC2BNW gives an update on some vintage radios he enjoys using as part of his different SOTA and related outdoors adventures.


Thursday, April 22, 2021

The perfect Icom IC-705 case?


Will this post address every possible need that everyone may have when using the Icom IC-705 at home, in the field or on a picnic table?  Probably not, but I think this comes awfully close to meeting my needs so thought worth sharing my journey.

How do I want to use the Icom IC-705?

After acquiring this radio, I spent time getting familiar with its functions and watching what accessory purchases others were making.  

Lessons learned as an early Yaesu FT-817 purchaser almost 20 years ago proved that spending more than that radio cost for addon's got quickly out of hand.

And, since the Yaesu FT-817 brand new back in the early 2000's was much less than the Icom IC-705 today, I wanted to go about things a bit smarter this time around.

My intended use cases for the Icom IC-705 are as follows:

  • Toss it in the backpack for easy to deploy legitimate field operations in rough conditions.
  • Perfect vacation and traveling demo "shack in a box" scenarios to excite new prospective hams.
  • Fill the "If I could use just one non-handheld radio" use case...
As a QRP enthusiast, I am fine with 10 watts RF output on all bands with external power or 5 watts on the internal battery. I also do not mind no internal tuner as I usually use resonant antennae for specific uses cases like satellite, digital modes and SOTA. 

Case:  The cornerstone of all accessories

Someone did the hard work already and shared this on the Icom IC-705 Facebook User Group, so I purchased this enclosed hard case for reasons explained later compared to a soft or protective rail case. 

Cost was $12.99 USD for the large size case in orange on Amazon and is made in the USA.   Purchase link:  MTM Survivor Dry Box with O-Ring Seal


The Icom IC-705 fits perfectly in this case and offers some extra room for a few basic accessories such as the wired microphone and a VHF rubber duck antenna or small end fed wire for HF.  The extended BP-307 battery fits just fine and that lives full time inside the case now attached to the rear of the radio.


Case Access:  Before making holes for antenna stuff

The MTM case is a dry case, which means your expensive radio wont get wet or screen scratched when its inside this protective cocoon.  I am not going to say its waterproof, but it feels like I would not have a moisture issue so will call this case weather tight instead. 

Since you can pretty much operate the Icom IC-705 fully remote using software or a mobile device described later, I only wanted to make a external holes for antenna and power wiring.  

First thing you need to buy is a BNC cable that has a right angle male on one side and a female BNC bulkhead on the other.  Spending $9.49 USD, the Eightwood BNC Bulkhead Female to BNC Male Right Angle Adapter RG58 Cable 50cm /1.6 feet is what I settled on.

The length of cable also solves a counterpoise issue on the two meter band since using most standard HT antennae with the IC-705 do not work well, so this is a hidden benefit. 

The right angle BNC male is what connects to your radio. A straight BNC will be too long to go inside the case. This is why having a right angle is needed. If an easy to source right angle bulk head was available, I would have went for right angles on both sides to give me even more flexibility.

Carefully placing and putting a hole in the side of your MTM case is important, so measure twice and cut once!  

You want to avoid the straight part of the BNC bulkhead cable hitting the side of the radio inside the case. It is best to make your entry hole as indicated in the picture below.


You may notice a nice binding post next to the new antenna connector. This also has a hidden benefit since you will find you need a grounding point on your radio to connect a counterpoise for HF operation to your radio.

Purchase  Jabinco 2pcs Gold Plated Insulated Terminal Binding Post Power Amplifier Dual 2-Way Banana Plug Jack for a total of $4.99 USD and you will end up with 3 spare terminal posts you can use for some other project, like some type of portable balun.  Or, you may have a spare binding post left over from another project you can use instead, but this one is very high quality and I recommend this.

Using one of these posts will give us a ground connection to the radio. You can either use some bare copper wire or a thin piece of sheet metal with appropriate holes drilled to connect this binding post to the outer conductor of the BNC bulkhead on the inside of the case.

Be sure to tighten up your connections correctly and you now have a case with external antenna connections that are weather tight and be sure to test that your ground lug and antenna port are now connected by using your continuity function on a multimeter. You should have close to zero resistance.

Case Access:  Adding power 

It would have been nice to just use Power Pole connections for power, but they take up more space inside the case and some may require more complicated hole making, so using the "standard" 5.5mm O.D.  x 2.5mm I.D coaxial power connector which the IC-705 and the Elecraft KX2 and KX3 uses seemed like a better low profile idea. 

There are also many external battery packs and inverter generators that use this same connector, so I am not worried about interoperability too much since this is a lower current connector and the additional benefits of the Power Poles are not needed.


You will need to drill your hole carefully as pictured and then you will need to solder on a male right angle 5.5mm O.D.  x 2.5mm I.D coaxial power that will connect to your radio after you pass the free ends into the dry box case.

If you want to add a reverse polarity protection diode or fuse, I will leave that up to you since the IC-705 does not offer much protection if you plug in your external power the wrong way.

When using a diode like a Zener type, be sure to realize that some voltage drop may occur from your external power source. For the Icom IC-705 to give you maximum RF output, the below chart will help you.


The internal battery pack is only capable of 7.4 volts, so to get that extra kick of RF output, you need to be over 12.5 volts always if you need that extra tiny bit of decibels to make radio contact.

If you need to connect power poles, you can use a ready made cable like this one by Windcamp for $12.99. 

How to access the IC-705 now?

This is not yet a perfect solution. You will need to find a way to secure the IC-705 inside your case which may require bending a piece of sheet metal to make a bracket that can screw to the underside of the IC-705 and you can then Velcro the radio into the case.  


You can also decide to skip that construction step and ruin your radio by putting Velcro on it or your battery directly.  This is left up to you on how you like to do things. 

This really good Velcro allows for easy removal of the IC-705 so you can access the SD Card, USB port, keying jack or the other connectors you may care about.  

Icom has not enabled a way to access the SD card over Wi-Fi or Bluetooth via FTP or anything else should you want to grab screen captures or audio recordings from the radio.   

You can also not access those files over USB either, so this is one reason why you will need to remove the IC-705 from the case.

The other connectors for my personal use cases were not important, but if they are for you, that is up to you to solve for. 

I would however think to maybe add an external USB in the future if I can find a suitable connector for times where I do not thing that low power wireless signals like Bluetooth or Wi-Fi are appropriate but wish to still control the radio remotely.


Everything else can be done "almost" over bluetooth or Wi-Fi

Control of the radio can happen over bluetooth or Wi-Fi for different reasons. Using a bluetooth microphone solves some issues for portable voice operation but adds additional "how do I charge the bluetooth speaker complexity", so keeping the wired mic on hand is important.

I am only plugging in the microphone connector and not the speaker part of the hand mic. This will not impact if you use a bluetooth mic or digital modes.

If you want basic remote frequency control, you can use the 705 Remote application on Android or the free Icom RS-MS1A application.   

The Icom Android application will appeal more to those who want to use D-Star and related advanced functions where the 705 Remote by Ikeda Shogouki may be better for those looking for a classic VFO knob and more HF focused functions.  

The popular Dan Toma Pocket TXRX software does not yet support the IC-705 and your results will be mixed when using different CI-V addresses to try and use profiles meant for radios like the IC-7000, IC-7100 and IC-7300. For now, I am ignoring this otherwise great software and its capabilities.

Remote radio versus remote internet control operation

The prior mentioned basic remote setup will not offer much else than basic remote radio capability.

If you are looking for complete wireless control of your Icom IC-705, you will need to purchase the  Icom RS-BA1 software for about $120.00 USD that runs on a Windows computer or some other platform with containers or virtual machines. 

This Icom software allows you to use your radio totally remote from your computer, including virtualized COM ports for digital modes, audio and CAT operations.  

You can also use RS-BA1 to allow other software like FLdigi, WSJT-X or Ham Radio Deluxe to control or talk to your Icom IC-705 if you are interested in digital modes and wish to operate the radio remotely. For voice communication, you can use a headset or microphone with your computer.

One use case for this is putting your radio at near your portable antenna and then take your laptop to a comfortable rock or picnic table.   This way you can minimize feedlines which takes up more space and weight in your pack, if you are interested in portable operations and are not afraid of short range wireless signals

You can create a point to point Wi-Fi access point (AP) with the Icom IC-705 to connect your laptop to without the need of the internet for this type of use which is very nice.

Alternatively, if you do have internet access and wish to share your IC-705 over the "world wide web" from the field, you can do that instead by changing from AP mode to a regular Wi-Fi profile. 

If you are in the field, allowing the IC-705 to connect to a broadband hotspot or possibly an AREDN mesh network is possible.  You still need to use the Icom RS-BA1 software for this to work.

A second option, not requiring the expensive Icom software is brought to us by Norbert Varga and team via a workaround that can run on a Raspberry Pi and act as a form of  a "man in the middle" server that will bridge a computer and the IC-705 over Wi-Fi to make a server.  This may require some advanced setup to get it working if you are not very skilled with Linux. 

A link to this software and instructions are here: https://github.com/nonoo/kappanhang

While this works great, I would not recommend this if your goal is less complexity in a field environment since it means transporting a raspberry pi and power source for it which if bought new, getting the Icom RS-BA1 software may be a better long term solution. 

A third solution is the very excellent Win4IcomSuite by VA2FSQ. His software is less than half the cost of the Icom RS-BA1 and offers nearly all the same functions but also allows for better integration with other software such as digital mode or satellite related programs. This may appeal to those who do NOT want the Raspberry Pi solution complexity.

Summary:  Case closed?

Everyone has an opinion and I am not claiming this is a perfect solution for everyone, but it does offer complete protection of your expensive radio and offers the ability to use it in the field with a good degree of safety.  

Here is a list of things mentioned in this article if you wish to buy it all from Amazon Smile, which a tiny part of proceeds benefits the Overlook Mountain Amateur Radio Club.


Tuesday, March 9, 2021

Local Learning: DIY Filters & Cheap Spectrum Analyzers with N2KTV


One of the many great companies found in the Hudson Valley of New York is Fair-Rite Products Corp.  This Wallkill, NY based company specializes in ferrite based products and has been in existence since 1952.  You can read about the company history here. 

Ferrites are used in almost all electronic devices and are especially useful within the amateur radio community when it comes to building various filtering circuits or for helping to eliminate different types of RFI or radio frequency interference.  

The topic of ferrites and applications is far too vast to cover in one article, but Fair-Rite has some great technical notes and other content on its website.

Here is a latest video thanks to Bruce N2KTV who works for this important company. Bruce covers in less than 5 minutes, the theory behind low pass filters, design discussion and a perfect demonstration of  a 7 MHz low pass ferrite filter along with how to test it with a very inexpensive tiny spectrum analyzer, which has proved very popular since its introduction about two years ago. 


Sunday, February 21, 2021

Sure to OK: Fixing the HG-UV98


There is a fantastic upgrade that makes the Lanch HG-UV98 more than 30% better, according to members of the HG-UV98 Users Groups.io community. We have Kenny KT2KT to thank for this "surely" good to "OK" great upgrade among other things.

If you are in the market for a low cost and rugged dual band APRS radio, this radio is proof that community can improve on what a vendor offers by modifying its software, just like we have seen by the TYT MD-380,  Radioddity GD-77, Baofeng DM-1801, Anytone AT-878UV and Alinco DJ-MD5 series of radios. 

Who says hardware is the only thing worth modifying! 

Major Updates

One of the most easy to point out differences with Kenny's firmware update is the change of the main menu button from using the word "Sure" to "OK". 

Other big changes involve improvements for certain menu description such as the dual band display menu that now shows single or dual instead of words that made no sense plus improvements in the APRS and other function menus. 

How To Update

You will need good terminal software such as the free TeraTerm or Hyper Terminal  applications to upload Kenny's modified firmware to your radio.  His version is based on the latest official release by the manufacturer available as of the date of this article.

If you are a Linux vagrant rather than a Microsoft follower, you will likely understand how to take these instructions and get things to work on your computer to do the upgrade.  Apple hamsters will just need to figure things out on your own.

After unzipping Kenny's firmware somewhere on your local machine which will give you a *.bin file,  you will need to load this into your radio. 

The process is different than how Lanch administers its own firmware update process with a Chinese only language executable, but they do offer good English instructions. 

FOCUS:  You ONLY need the first link above for the new UI firmware. The other link is for the latest 9/20 APRS firmware from the manufacturer. The HG-UV98 needs both firmware and are separate from each other!!

Go ahead and plug in your USB cable to your radio and computer and figure out what COM port your USB cable has been assigned in the Windows Device Manager. 

On the computer used for this article, it came up as COM12, yours will be different but your cable will recognize as CH340. If you need the USB drivers, you can find them here.


Now we need to prepare TeraTerm or HyperTerminal to communicate with your radio.  

The process for both is below. Either software works just fine.  After you install HyperTerminal, your first step is to look below and then press OK.


Now go ahead and select the COM port your USB cable told you it got assigned and click on the "Configure" button right below.   

You will now need to change the communication speed from the default 9600 to the zippy 115200. 

Now go ahead and hit apply and OK.


Now its time to hold down the PTT button on your radio and turn on your radio at the same time. 

Your radio screen will show "Host UpData...." and your terminal screen will automatically display this:


Go ahead and press the "1" button on your keyboard and your terminal will now wait for you to upload the new firmware. Go ahead and go to "Transfer" and click on "Send File" in Hyper Terminal software.

You now need to navigate to where your freshly unzipped new firmware is on your computer and select the "Ymodem" protocol. 

Go ahead now and start the upload process and after a few seconds your computer will start uploading the file to your radio.


The transfer should take under three minutes to complete and be sure to wait for it to be finished.  

Once it has completed, now go ahead and turn off your radio, disconnect the USB cable from the radio and go ahead and turn your radio back on.

You will immediately know it was a success by seeing the word "OK" where your radio used to display "Sure". You can also navigate to menu 9 "About" and click into "Firmware" and you should also see the new KT version of the firmware. 

Go ahead now and enjoy better named menus on your Lanch HG-UV98.  There are no other improvements to the operation of the radio aside from just better naming.

If you ever wish you revert your radio back, you can use the other firmware from the manufacturer and its own how to guide.

Using TeraTerm instead of HyperTerminal

If you rather use TeraTerm, go ahead and select your COM port under the serial connection menu at program start.  

Then navigate to "Setup" and "Serial Port" in the top drop down menu and change the speed from 9600 to 115200. 


Repeat the same process of connecting your USB cable to your radio and computer and hold down PTT while turning on your radio.  You should automatically see the below on the Tera Term screen:


Be sure to press the "1" key on your keyboard so you get the "Waiting for the file to be sent...." message like above.  

Now you need to go to "File" and go to the "Transfer" menu and select the "Send" option and "Y Modem" just like we did with Hyper Terminal and be sure to find the new firmware on your computer that you will send to the radio.

It may take a moment for your radio and computer to decide its time to transfer the file, but you should start seeing it uploading. 

When its complete, that status bar screen will disappear and you will just see the Tera Term window.  

Go ahead and power off your radio, remove the USB cable and turn your radio back on and you will see the new firmware just like we saw with HyperTerminal.


Summary

If you are an intermediate to advanced computer user type of person, this extra clarity likely was not needed by you, but for those that are not familiar with these very useful terminal programs, I hope this step by step article was of use to you and your Windows computer.

As of late February 2021, the Lanch website seems to be back on most of the time, but still occasionally goes offline.  As reminder, here is that website as well as the vendor which is the best way to purchase the radio directly from.

It is rumored that a new version of the radio may come out, but its not clear if it will be a new model number or just fix a few things in the hardware that some users discovered that impaired some Bluetooth functionality.

Some later production model versions of this otherwise fine radio do not have all pins of the Bluetooth module soldered to the main board which prevents full functions as a KISS TNC via software like PinPoint APRS or APRSdroid for some unknown reason. This also seems to prevent users from using the Lanch HG-UV98 with WinLink as an example.

As we learn more about this, please check back here on HVDN. But, the radio still works fine for most users who may not want this advanced functionality.

Its time also we ACTUALLY do the long awaited APRS configuration update article, so watch out for that in the coming week or two.

Feel free to join the Groups.IO channel to give a thank you to Kenny KT2KT and to also keep up to date on the latest about this really nice APRS radio that does not cost a fortune.

Monday, December 7, 2020

Teardown: Alinco DJ-MD5XTG (2nd Generation DMR)


What can I cay, I have always liked Alinco products going back to my first ever HT, the credit card sized Alinco DJ-C1T.  

Much has happened in  the world of amateur radio since and Alinco continues to do interesting things via its latest DMR handheld offering, the DJ-MD5XTG. 

This article details from the inside out, what makes this model different than its predecessor. 

Alinco had different DJ-MD5 radios?

Let me first start out and dispel a rumor I created that the latest Alinco DJ-MD5XTG would support the 220 MHz band. It does not or at least officially, which makes the band coverage on par with the popular Anytone AT-D878UV, available from vendors such as Bridgecom.

At the time of this article, the second generation Alinco DMR DJ-MD5XTG is available in the United States by DX Engineering.

When purchasing an Alinco DJ-MD5 series radio, there are now three versions that have been created and the most basic DJ-MD5T is discontinued. The major difference between it and the Alinco DJ-MD5TGP is the inclusion of GPS functionality.

 If you are looking to sell your original DJ-MD5 series radio to offset the cost in buying the new radio or are looking for a deal, please think about some of the following based on the teardown of the new DJ-MD5XTG.

The major differences

I did the hard work so you do not have to by doing a basic tear down of the DJ-MD5XTG and comparing it to the DJ-MD5TGP, which I also tore down back in November 2018. The below non-RF major component  table will help guide us along. 

Both versions main PCB interestingly both show that they are both considered revision 2.0, but with different date of manufacture codes.

1st Point: You get a faster MCU with more memory

Really the only major difference is that the Alinco DJ-MD5XTG upgrades to a 1024k flash and 96k SRAM memory configuration which is identical to that of the Anytone AT-D878UV.  

The older Alinco DJ-MD5TGP and DJ-MD5T (Without GPS) has the 512K flash and 64K SRAM memory configuration. The GD32F3030 (VGT6) is what is found inside the latest Alinco DMR radio.

The extra memory, like in the competing Anytone radio, allows for Alinco to support a few new features in the software which we will talk about later such as roaming and analog transmission of AX.25 based APRS. There is also a GPS/Baidou toggle, weather alert and few other changes.

Alinco DJ-MD5XTG MCU HVDN

If you have really good eyesight, you may notice what appears to be sloppy soldering on the MCU, but this is intentional. 

Alinco has bridged the shown pins on purpose, just like as found in the earlier Alinco DJ-MD5 radio as well as the Anytone AT-D878UV and the earlier AT-868UV. 

I just want to point this out that there is no bad workmanship inside this radio, especially since many find it easy to question construction capabilities of radios made today to save costs because of frugal or entry level customers.

The Alinco DJ-MD5TGP is indeed a high quality product and assembled/manufactured in Japan and not China like most, not all Alinco communications equipment.

However, the absolutely useless instruction manual which is little more than an instruction guide on how to attach the belt clip, connect the battery, screw in the antenna and turn on the radio along with some basic operation instructions is indeed printed in China, so take that for whatever value you want to place on that.

For what the manual is, it is rather well made and laid out, but just lacks any major value.

2nd Point:  Newer versions of other major components

Beyond the MCU (Micro Controller Unit), the baseband vocoder which helps your radio become a DMR radio, has a new production code and but is identical to the 2018 version of the SCT3258TD. 

Everything else is the same too and the only other differences which have not yet been thoroughly  tested  on the the main PCB are some slight changes in the RF front end and filtering compared to the older radio.  The below photo shows the main PCB along with the two RF shields removed on the DJ-MD5XTG.

3rd Point: What does the FCC have to say?

The Alinco DJ-MD5XTG does carry the FCCID of  PH3DJ-MD5, which is the same as its predecessor, so we may see an update on the FCC website in the coming months, but it does not seem like it may mean much from an RF perspective. Here is the Alinco DJ-MD5XTG fully disassembled.


What attracted me to the Alinco DJ-MD5TGP back in 2018 are the same reasons as the DJ-MD5XTG.

Starting with how to program the Alinco with the Computer Programming Software (CPS) is that you use a common USB micro cable used with smart phones instead of a dedicated cable like that of the Anytone and other radios like the TYT, Radioddity, Lanch HG-UV98, Baofeng and Ailunce radios that have been covered across past HVDN articles plus the much higher end Kenwood TH-D74.

This may be a benefit to some people if you have a habit of misplacing things and need an instant replacement. It is also worth noting that while the Kenwood D74 can be programmed wirelessly via Bluetooth, it can also use a standard USB micro cable as well.

Another reason I like the Alinco over the Anytone is that it is a perfect radio for taking hiking. The speaker/microphone connection uses a 3.5mm jack for the speaker/headphone function and the smaller 2.5mm jack for the microphone. 

While this is now considered opposite of what used to the standard, this lets me use a regular pair of wired 3.5mm stereo headphones or earbuds with the Alinco should I wish to listen to communications or music privately.  While its common to have Bluetooth earbuds these days, sometimes a wired version is helpful to have since they do not require rechargeable batteries!

One thing I did learn with the original Alinco MD-5TGP is that using a speaker microphone seems like a burden, even with the nicely made Alinco EMS-76.  

Alinco and its resellers caution every user to only use this microphone with this new DMR radio, but if you have an older microphone wired the same as the EMS-76, it will work just fine. 

Just avoid trying any of the speaker microphones meant for other radios as they will damage your radio due to incompatible wiring.

I say a speaker mic might be a waste since the microphone is nearly the same size as the radio itself. Instead, while hiking as an example, I just clip the radio upside down on my pack strap such as pictured below while visiting Red Hill Tower last September as part of the Catskill Fire Tower Five Challenge.


The Anytone AT-D878UV still offers Bluetooth capability for remote PTT and for pairing to external audio devices.  It would be nice to see bluetooth added in the future to the Alinco DJ-MD5 series, but battery life may then become an issue.

My personal opinion is that I do not see this as any shortcoming. Please also be aware that the SMA-J style antenna connector is used on the DJ-MD5XTG like its predecessors, so this is NOT the same as what is used on the Kenwood D74 for comparison.

Software:  This needs another article or three, maybe four?

There are some new features found in the Alinco DJ-MD5XTG which will really make it appeal to those that enjoy an active converged lifestyle and some future articles will cover:

  • What is roaming and do you really need it?
  • Analog APRS:  This is the original, not the new APRS or D-APRS
  • GPS: How do you set it up and actually use it
  • Proof is in the programming:  Basic US Alinco DJ-MD5XTG code plug
  • Talking about the band options in the Alinco DJ-MD5XTG

Keep an eye on the HVDN Notebook for future articles all December long about the Alinco DJ-MD5XTG or bookmark this handy link. https://hvdnnotebook.blogspot.com/search/label/Alinco%20DJ-MD5XTG