Showing posts with label MMDVM DUAL HS. Show all posts

Friday, December 31, 2021

K2GOG EOY 2021 Loose Ends #3: MMDVM Pi-Star + RPI Zero 2 W Upgrade


My primary duplex hotspot was last reconstructed all the way back in 2018 and has been reliable at home or for select field demonstrations ever since.

Beyond swapping out the SD card and upgrading the firmware, nothing from a basic hardware perspective has changed for almost five years.

With some spare time today as the year comes to a close, it was time to finally upgrade the Raspberry Pi Zero W v1.1 to the newest Raspberry Pi Zero 2 W released earlier in the year as part of my N5BOC based duplex hotspot.
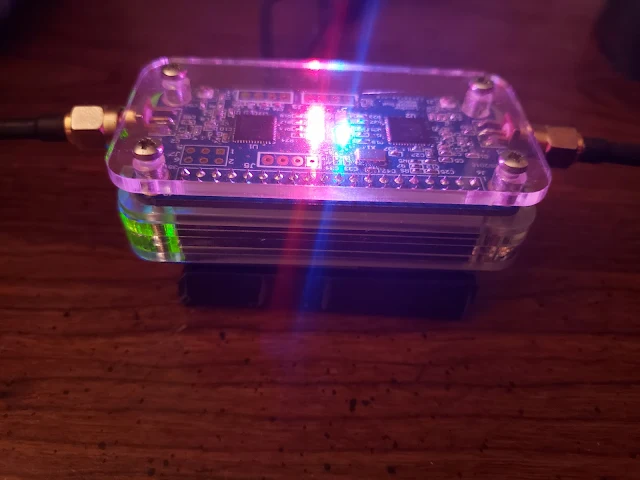
N5BOC, K2GOG, MMDVM Duplex,  Pi-Star Duplex
We have the blinky blinks with the hotspot which means its working!
(Photo Credit: Steve Bossert K2GOG)

Computing Differences

As the Pi-Star software package has continued to evolve, it has become evident that the older Raspberry Pi Zero was underpowered with its single core CPU.  

The new Raspberry Pi Zero 2 W has a total of four CPU cores certainly will add more horsepower behind the scenes to my hotspot.

I am expecting a noticeable power consumption increase due to the additional computing power, so this is something I will need to analyze further if I want to take this unit portable.

Raspberry Pi Zero Wireless 2 offers 4 CPU cores which is 3 more than the earlier version. The prominent RF shielding over the Broadcom chip is a notable addition on this latest board which will be popular with the digital voice community looking to upgrade MMDVM hotspots
(Photo Credit: Raspberry Pi Foundation)


Power of the Pi

My N5BOC duplex board has been surrounded by one of the C4 labs laser cut cases for a long while.

Sometime in 2019, I made the addition of a PiSugar battery pack to the bottom of my hotspot to give it some back up and limited portable power.  

This small battery pack is also part of the HASviolet project, so that is why I had a few more on hand.

I am not expecting this this small 3.7v 1200 mAh battery will last now, so will have to do some tests.  

The reason I like using a PiSugar is that if by chance there is a power surge since I operate a hotspot remotely, this gives me some additional protection. 

PiSugar battery pack
(Photo Credit:  PiSugar Git Page)


From a full charge when running the older RPI Zero, I would get about 4 hours run time, so I am expecting maybe half that with the more power hungry RPI Zero 2.

The normal USB power supply  at home I use is rated at 5 amps, so I will have to consider doing some measurements on current draw over the next few weeks to see how the RPI ZW2 compares to the older RPI ZW1.  

Surgery Upgrade

If you have experience with the C4 Labs cases, you probably know it took practically no time to solder on a new 2x20 header to the RPI Zero 2 compared to putting the case back together.

No changes to my SD card image needed to be made which was already running the latest version of Pi-Star. I simply put the SD card into the new RPI and everything worked right away after connecting to the new IP address.


N5BOC, K2GOG, MMDVM Duplex,  Pi-Star Duplex
While running "sudo pistar-update" after moving to a fresh install
of Pi-Star on a Raspberry Pi Zero Wireless 2
(Photo Credit:  Steve Bossert K2GOG

Then there was a problem....

While I did run "sudo pistar-update" and "sudo pistar-uprade" on the RPIZW1 prior to switching over to the new RPIZW2, after an initial play around, I ran into an issue when doing same update/upgrade on the RPIZW2 and needed to start with a fresh install of Pi-Star in the end since I could not log back in are connect over LAN.

Lessons learned over the years, when in doubt if you can not solve the issue in under 10 minutes, just start with a fresh pi-star image.


N5BOC, K2GOG, MMDVM Duplex,  Pi-Star Duplex
Ran sudo pi-star update for a second time to ensure all packages were up to date
(Photo Credit:  Steve Bossert K2GOG)


So, I ended up flashing a fresh version of Pi-Star and did the upgrade and update paths and ran into no issues. I suspect there was something with a buster based dependency issue or kernel specific anomaly. 

I would suggest just starting from scratch in my opinion to remove any gremlins that will happen at an inconvenient time. 

Keep running sudo pistar-update and or upgrade until everything seems fine before you go and program the pi-star specific things you need like frequency, modem, callsign, etc.


N5BOC, K2GOG, MMDVM Duplex,  Pi-Star Duplex
Even though everything was thought to be current after moving to Raspberry Pi Zero Wireless 2,  running sudo pi-star upgrade uncovered some additional packages needed by the newer Raspberry Pi.
(Photo Credit: Steve Bossert K2GOG


Was it worth it?

For $14.99 thanks to a recent trip to Micro Center, the upgraded horsepower now part of my Pi-Star MMDVM N5BOC hotspot seemed like it was a great idea.


K2GOG duplex hotspot made from a N5BOC duplex board,  Raspberry Pi Zero Wireless 2 and a PiSugar battery all contained in a C4 Labs case. One of the USB wires is for power that plugs into the PiSugar. The one is for a GPS that plugs into the OTG port on the RPI Zero Wireless 2.  External 433 MHz mini mag mount antenna are connected via the SMA ports.
(Photo Courtesy:  Steve Bossert K2GOG)


Thursday, September 19, 2019

What happens when: Multiple DMR signals & SDRangel


The below video shows native DMR decoding with SDRangel software. On 427.505 MHz is an OpenSpot V1 and on 427.565 MHz is a duplex "China" Spot. 

It is very easy to leave the SDR, in this case the inexpensive NooElec Nano3 tuned to 427.565 and then toggle in the channel down to 427.505 MHz.  Both hotspots were tuned to the same talk group of 31630 during the Tuesday evening Northstar Digital Net.

One thing to notice is that the carrier time keys up quicker and also "hangs" when a discussion drops compared to the quicker times on the duplex "China" Spot.

With SDRangel, you can "run" multiple decoders for different (or the same modes) at the same time. 

You would leave SDRangel "tuned" to one frequency and you can then tune up or down from that frequency in each decoder. This will work within the SDR's capable bandwidth. In the case of the NooElec Nano3, this is 2.8 MHz. 

Also, you can "run" multiple decoders (Analog FM Narrow, DSD for digital voice, Channel Analyzer, etc) all at the same time on the same frequency to just "hear" for example the buzzzz sound of DMR via the analog FM Narrow decoder PLUS the actual DMR demodulated audio AT the same time.

There is A LOT of capability with SDRangel. Give it a try. You will like it and the ability to customize the layout to your liking for certain tasks.


Thursday, February 14, 2019

March 23rd: TCF19 Computer Festival


This event has a little something for everyone interested in modern technology and applications, not just related to amateur radio or even computers.

The featured keynote this year will be led by Tony Sager of the Center For Internet Security which is headquartered just outside Albany, New York.  Tony will talk about the importance of cyber-security and how it affects almost every aspect of our connected lives today.

Other featured presentations include:
  • The State of Cyber Crime in New Jersey by NJ Department of Homeland Security Cyber Team!
  • Maintaining the Integrity of Elections in a Digital World – Rebecca Mercuri
  • Quantum Computing – Barry Burd 
  • Amateur Radio Satellite Spectrum - Steve Bossert 
  • WordPress Bootcamp – Lou Judice
  • Cybercrime and Theremin Zen – Kip Rosser 
  • MMDVM Hotspot Construction - Joe Apuzzo  
  • Hands-on Arduino Workshop for Beginners – Katalin Frolio
  • All Day Robotics Pavilion – Seung-yun Kim
What about amateur radio? 

HVDN's very own Joe Apuzzo N1JTA and Steve Bossert K2GOG will be among the 50+ presentations and workshops also taking place during this fantastic event.

In N1JTA's 30 minute presentation he will talk about how radio and computers has converged through the popularity of digital modes in Amateur radio and how it has grown exponentially over the last few years due to the affordability of VHF/UHF digital handheld radios and other equipment.

is full duplex capable and the same size as a Raspberry Pi Zero. 

A large part of this growth can also be attributed to the impact of hot spot devices and the unique learning capability they create. A hot spot is a small access point type device that uses amateur radio spectrum and a decentralized network of servers to enable global or local  digital communication.

Joe will cover at a high level, what is needed to construct your own "micro repeater" or hot spot device and how it works, along with how to create secure connections and utilize a decentralized network maintained by a group of amateur radio operators around the world.

Brandmeister is unique in that it can route all types of digital voice traffic through its decentralized network of servers to end node devices such as hotspots and repeaters

Since the hot spot device is nothing more than a Raspberry Pi single board computer and a multi mode digital voice modem hat plus some open source software called Pi-Star it is relatively inexpensive but very complex to understand how it works.

Steve will be cover in varying detail more than 21,000 MHz of spectrum available to amateur radio operators looking to experiment with satellite communications today. While much of this spectrum is above 1.2 GHz, this still leaves over 60 MHz of varied spectrum that can be used by those holding the easiest to get Technician class amateur radio license and with minimal expense.

Your DMR radio can also be used for satellite communications
via analog FM mode you might have forgot exists.

Steve's discussion will cover the most common spectrum used today for amateur radio operators interested in satellite communications, additional spectrum users to be mindful of and a review of the most active satellites that can be used with less than $100 of invested equipment.  He will also give a "sneak peak" on this topic to attendees of the March 11th HVDN meeting in Rhinebeck, NY.

More about TCF19, the full agenda and when is Joe's presentation can be found at https://tcf-nj.org/

Interested in other interesting events? Check out the HVDN activity calendar


Monday, September 17, 2018

Review: N5BOC Duplex Hotspot Board

Quality of construction has proved important across all newer digital voice capable radios and related infrastructure.

Modes such as DMR, NXDN and P25 all require stable clock sources to ensure proper operation with DMR especially requiring this because of its capability to allow two simultaneous data or voice streams on the same frequency at the same time. 

As the old adage goes, "You get what you pay for" holds especially true for the most modern of amateur radio equipment.

MMDVM raspberry pi zero  duplex texas lone star
David Dennis N5BOC has created a high quality small duplex MMDVM board for use
with the Raspberry Pi Zero or any of the larger Raspberry Pi too 


This review provides some observations on the N5BOC designed duplex multi-mode digital voice modem (MMDVM) that packs a lot of capability into a very small form factor.

The key benefits of buying the N5BOC duplex board compared to the foreign manufactured ones are as follows:

  • Gold plated contacts for superior on-board connections
  • Thicker PCB material for improved DC and RF stability
  • Additional u.FL connectors for external "pigtail" connections
  • ECS branded TCXO for very stable frequency operation (No offset likely required)
  • 1/2 the size of foreign made duplex board
  • Lower power consumption compared to foreign made duplex board
  • Help support domestic US amateur radio community design talent
Further details about why David Dennis designed this product, his design goals and user manual can be found HERE.

This MMDVM duplex board is handmade in small quantity to ensure quality. They sell out quickly, so be
sure to get on the waiting list and purchase it as soon as they become available.

After creating a fresh Pi-Star image and setting up both time slots with active talk groups such as 91,310, 3100, etc and running it this way for an entire weekend on a 16000mAh power bank, here is what was learned.

Feedback #1: Running the N5BOC board on a Raspberry Pi Zero lasted 11 hours longer compared to using the foreign pictured duplex board with identical rechargeable power sources down to 50% battery capacity.

getting started MMDVM hotspot
Comparing the N5BOC duplex board to foreign duplex board

Feedback #2:  No offset was required on the N5BOC board compared to the pictured foreign board.  Better design and material likely attributed to this. 


Feedback #3: The N5BOC board is well thought out and designed compared to the single sided and less complex foreign board options


Critical Comments:  It is hard to find something to complain about with this product because all the underlying concepts are not new to me, but I would like to see:

What? User install-able SMA connectors for different mounting options and use of u.FL connectors instead which are great to see included.
Why?  Some people may not have good de-soldering skills and may want to use "pigtails" instead.
What? J3 connector placement for an OLED display if installed will block the on-board status LEDs 
Why? No big deal, but some may get annoyed by that. Good reason to consider other display mounting options or even a "wireless" display or just block out the LED by adding a display over the top anyway which can be turned off in software more easily then LEDs.

MMDVM OLED N5BOC
Connector pin out description for N5BOC duplex board


Final Comments: For the current price of just under $100, this is a very good piece of engineering. My current fully enclosed duplex board looks like an ancient prototype compared the smaller N5BOC board and am looking forward to an official case or creating something of my own.

Will the N5BOC duplex board look as cute when it gets an enclosure?

Friday, August 24, 2018

Wireless Nextion Display You Say?

When I started tinkering with the JumboSpot and small OLED displays, it got me interested in larger and informative display options, so I quickly picked up a few Nextion style displays as covered a few months ago in the "Bigger Display for Jumbo/China/Covert" article.

Even though having a larger and more informative display to be used with the MMDVM based hot spot is great to show callsigns, name, location, IP addresse, temperature, etc, that means the hotspot can not be put where I want the hotspot for maximum RF range and still see the display.


Be sure to purchase a Nextion display and not a TJC branded one. Only the Nextion version has English development software. TJC screens are designed for the China market or those that can read Chinese software. Otherwise, they are the same thing and would work fine with any MMDVM Pi-Star Hot Spot

So, what about making the display itself remote from the actual hot spot?  Seemed like a good idea and here is what I have done to make this a reality.

Wireless Nextion Display

Getting the correct signal from the hot spot was easier than I thought after some research and decided instead of trying to send the signal over wireless serial blue-tooth connection to a remote receiver that feeds a Nextion display that using 70cm amateur radio spectrum would be just be a bit more fun to experiment with.

Silicon Labs is just one of the companies with components
that make this small data transceiver module a reality


Inexpensive HC-12 modules allow serial based communication over a wide range of speeds and can be configured to operate on a number of predefined channels set by the manufacturer or configured by the end user. Here is a great user manual I found on the Elecrow website that will fill in some of the blanks on its capabilities.

The HC-12 can be driven from from the TXD, GND and VCC pins on the duplex or semi duplex hot spot boards easily.  All I needed to add was a 1N4007 diode to drop the voltage a little in order to not over drive the HC-12 module since its sensitive to over voltage.

Since I was not interested in providing a two way wireless connection, there was no need for the RXD connection between the hotspot and HC-12.

Steve K2GOG SDR capture of MMDVM DMR audio and HC-12 pulses


After getting everything connected, crossing my fingers and apply power, I started to see pulsed signals being sent on the default HC-12 module frequency of (3) 433.400 MHz as shown on the screen capture by using an inexpensive SDR dongle sch as the NooElec Nano3 and the popular SDR# software package.

The other two signals shown is the output or transmit signal generated by my duplex hotspot that was connected to the HC-12 and was set to operate on (1) 432.525 MHz, only 875 kHz away.

The very narrow continuous unmodulated signal at (2) 433.063 MHz seems to be coming either from my cable modem or cable line, but does not seem to be an issue I can easily fix, so just ignore that.

Within the Pi-Star dashboard, I selected screen type as "Nextion", port as "Modem" and Nextion Layout as "ON7LDS L3" since that is what I use with my 4.3 Inch Nextion display that runs a modified version of one of the nice layouts found in the file section of the Nextion Ham Radio Screens Facebook Group


Connecting the HC-12 module to the Nextion display was a little more tricky to receive signals though.  I connected the RXD and GND from another HC-12 to the Nextion display and ran +5V to power up the display.

I needed an isolated power supply with another 1N4007 diode to power up the HC-12.   Everything worked on the second try!   The first try was when I accidentally forgot to use a diode to drop the voltage and "smoked" an HC-12, but that is why I ordered a few spare just in case!

On the second try I thought I had a different issue, but as it turns out the default setting of the HC-12 is pretty high transmit power and I recall the manual saying to separate modules by a few feet.

Once I moved the contraption across the room, my display was updating with users chatting away on TG 91 worldwide DMR talk group!

An Additional Future Experiment

Here is where I hope to get some people interested and assist with an extra added feature/benefit.  What about decoding the data packets that the HC-12 transmits by using the SDR?

Its possible to decode weather stations, door bells and other 433 MHz range devices with the rtl_433 application when used with an SDR dongle, so maybe someone can find a way to translate the pulses and view those on a computer or smartphone connected to an SDR?

There are likely many protocols that an HC-12 can send and receive, so why not figure out a way to add another to read what the Nextion display expects to see and render that in some sort of application.

It is easy to record and playback "spectrum" with SDR#. To play back the file related to this article, instead of  selecting your own SDR device in the menu drop down, select "IQ File (*.wav) and navigate to where the base-band recording downloaded here was saved to. Then press "Play" and be amazed! 


To get anyone (and everyone) started, I did a base-band recording that can be easily played back in SDR#. You can play back the file as if you were in real time listening to the signals sent by the Nextion. Its even possible to use DSD+ to decode the active DMR audio signal too! 

Caution:  Using DSD+ can be daunting, so look elsewhere on getting that to work.
This way you can know who is speaking to match it against the pulses sent by the HC-12. The pulses will show call sign, talk group and DMR ID to whom ever can decode it so you know what sort of information to look for in the packets.

Just 37 seconds of 2 MHz wide of spectrum took up 225MB, so I have it hosted on Google Drive.


The First HVDN Contest

If you can make some progress, share your tips in the comments below or send a private email instead via one of the HVDN contact forms.   

First maker, hacker, ham, etc to make MAJOR documented progress, Hudson Valley Digital Network will reward your efforts with an HC-12 and an RTL-SDR device, so ready.....set..... 01000111 01001111 00100001


Thursday, August 23, 2018

Improving the TCXO for Duplex MMDVM Hotspots

Various MMDVM hotspot devices have been on the market for about 3 years now and only recently have there been duplex ones available, which create more capability but with more complexity.

Proper passive and/or active cooling is a must when it comes to proper
operation of the duplex hotspot devices currently on the market.
Pictured device was constructed by Steve K2GOG


This HVDN article will explore making some thermal improvements to the duplex MMDVM boards that have become widely available over the past few months and are replacing many of the older hotspot devices available over the past few years.

The TCXO is one of if not the most critical part on the duplex
 hotspot device that creates user satisfaction

Problems and Corrections For Duplex MMDVM Hotspot Operation

TDMA based modes such as DMR are very reliant upon very stable time references. In order to create the simultaneous TS1 and TS2 capability, the TCXO needs to be extremely stable and quality components are only part of the equation.

If a Raspberry Pi 3 or 3B+ is to be used with many of the duplex hotspots, its important to do the following:

More Power: Ensure you are using a 5V 2.5A continuous or higher power source. Your RPI3B+ draws enough current and when coupled with the duplex board creates a higher load.  You need ample enough current to ensure stable operation.
Remove Heat: Placement of the MCU on the Raspberry Pi can create enough heat that will rise to the bottom of the Duplex MMDVM board which can influence its stability. You must use a heat synch or heat spreader accordingly to keep temperatures stable and as low as possible. These techniques are often known as passive cooling.
Move Heat: If it is not possible to remove heat, you can move it by using active cooling through the use of a small fan.  If choosing this route for heat management, consider the current impact this may have on your power supply.

Passive cooling through the use of self adhesive heat
spreaders on the bottom of the MMDVM duplex board

Appropriate Enclosure:  Do not choose to mount your assembled RPI3B plus MMDVM Duplex hotspot in a plastic, Plexiglas or 3-D printed enclosure. This enclosed and insulated enclosure may limit the life of your hot spot as well as impact its overall performance. Consider a metal or open frame construction if there is no option for active cooling available.
Proper RF Grounding & Shielding: Proper selection of antennas and installation of the SMA connectors is important to top performance of your hotspot.  Selecting the correct frequency that will best perform with your antennas and characteristics of your MMDVM device are important. HVDN recommends using frequencies in the lowest part of the 70cm allocation in your country for transmit as well as receive with appropriate spacing and separation.

Inside of Steve K2GOG's passively cooled duplex hotspot. Changes include extended SMA antenna
connectors to pass through the top of metal vented enclosure, passive heat spreaders under the
TCXO and directly above where the MCU is directly underneath the MMDVM board.

Correct Firmware:
 The development teams that create the hardware and software constantly make revisions based on user feedback. As of the August 22nd 2018 revision, improvements for TCXO management have been included in the firmware and it is advised for users to upgrade to atleast FW. 1.4.7 to take advantage of this. Here is a good article on how to update the firmware by Joe N1JTA

If you choose to use the Raspberry Pi Zero series of single board computer, many of the heat related issues are not much of an issue.   There is only one duplex board available that has a similar footprint as the RPIZW and is made by N5BOC and is available for purchase on Tindie, but HVDN has not yet been lucky enough to get one just yet for testing.

The N5BOC  duplex board is the smallest and most stable hotspot
device on the market capable of dual time slot operation

To learn more about some of what has been discussed in this article, here are some additional links:

https://github.com/juribeparada/MMDVM_HS

https://github.com/g4klx/MMDVM

https://github.com/nano-mmdvm/Duplex_hotSPOT

https://www.tindie.com/products/dave31418/mmdvm-duplex-in-pi-zero-form-factor/

https://www.facebook.com/groups/213986962488948/search/?query=tcxo 

https://www.makeuseof.com/tag/keep-raspberry-pi-cool/

https://www.digikey.com/product-detail/en/taitien/TXJTPDSANF-14.745600/1664-1281-1-ND/6126591

https://github.com/rogerclarkmelbourne?tab=repositories&type=fork

https://www.amazon.com/gp/product/B0755S5J3G/ref=oh_aui_detailpage_o06_s00?ie=UTF8&psc=1

https://www.amazon.com/gp/product/B07217N5LS/ref=oh_aui_detailpage_o05_s01?ie=UTF8&psc=1